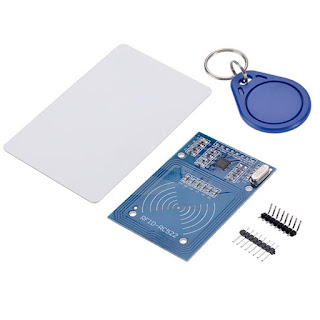
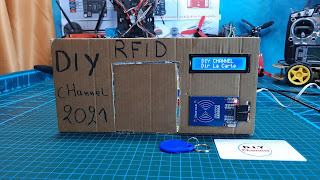
مشروع به RFID و I2C LCD فتح باب منزلك او ناافدة بعلامة RFID ومحرك سيرفو لقد استخدمت لهذا المشروع وحدة RC522 RFID
- المكونات الاساسية :
- Arduino UNO R3
- RC522 RFID Module
- Servo Motor
- i2c LCD Display
- Breadborad
- Jumper wires
- مخطط الرسم البياني :
- تحميل الكود أردوينو :
// Project : Arduino UNO with RC522 RFID module and I2C LCD
// By : DIY Channel
// My Youtube Channel : https://www.youtube.com/c/DIYChannel2019
#include <SPI.h>
#include <MFRC522.h>
#include <Wire.h>
#include <LiquidCrystal_I2C.h>
#include <Servo.h>
LiquidCrystal_I2C lcd(0x27,16,2);
#define SS_PIN 10
#define RST_PIN 9
MFRC522 mfrc522(SS_PIN, RST_PIN);
Servo myServo;
int *aux;
int card1[4];
int flag = 0;
int led = 13;
int cnt =0;
void setup() {
pinMode(led, OUTPUT);
lcd.init();
lcd.backlight();
SPI.begin();
mfrc522.PCD_Init();
lcd.print(" DIY CHANNEL");
lcd.setCursor(0,1);
lcd.print(" Dir La Carte ");
myServo.attach(3);
myServo.write(0);
}
void loop() {
if ( ! mfrc522.PICC_IsNewCardPresent()) {
return;
}
if ( ! mfrc522.PICC_ReadCardSerial()) {
return;
}
for (byte i = 0; i < mfrc522.uid.size; i++) {
aux[i]= mfrc522.uid.uidByte[i];
}
if(flag == 0)
{
lcd.clear();
lcd.print(" Card UID: ");
lcd.setCursor(0,1);
for (byte i = 0; i < mfrc522.uid.size; i++) {
card1[i] = aux[i];
lcd.print( card1[i], DEC);
lcd.print( " ");
flag =1;
}
delay(3000);
lcd.clear();
lcd.print(" DIY CHANNEL");
lcd.setCursor(0,1);
lcd.print(" Dir La Carte ");
}
else{
for (byte i = 0; i < mfrc522.uid.size; i++) {
if(aux[i] == card1[i])
cnt++;
}
if(cnt == mfrc522.uid.size-1)
{
lcd.clear();
lcd.print(" Marahba Bik ");
lcd.setCursor(0,1);
lcd.print(" Dkhol LDarkom ");
delay(200);
myServo.write(90);
delay(5000);
myServo.write(0);
}
else
{
lcd.clear();
lcd.print(" Sir Chof Lik ");
lcd.setCursor(0,1);
lcd.print(" Chi Dar Khera ");
delay(2000);
}
}
lcd.clear();
lcd.print(" DIY CHANNEL");
lcd.setCursor(0,1);
lcd.print(" Dir La Carte ");
cnt=0;
}
-----------------------------------------------------------------------------
arduino,arduino rfid rc522,arduino project,arduino rfid door lock,arduino tutorial,rc522,arduino rfid reader,arduino uno,arduino rfid tutorial,rfid arduino,arduino rfid project,rfid door lock using arduino,door lock system using arduino,rfid rc522 arduino,arduino rfid buzzer,access control using rfid rc522,door security system using arduino and rfid rc522,control servo motor with rfid tag and arduino,arduino rfid,door lock using arduino,arduino rfid card,arduino rfid code,arduino projects


thank u body !!
ReplyDeleteFabulous post, you have denoted out some fantastic points, I likewise think this s a very wonderful website. I will visit again for more quality contents and also, recommend this site to all. Thanks. rfid label price
ReplyDelete