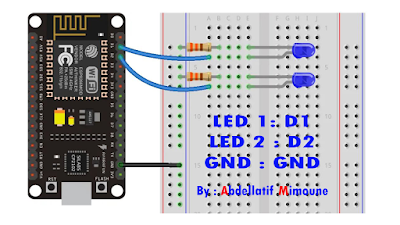
هذا المشروع عبارة عن دليل مفصل خطوة بخطوة يوضح كيفية إنشاء خادم ويب ESP8266 مستقل يتحكم في ناتجين (مصباحان LED). يعتبر خادم الويب ESP8266 NodeMCU مستجيبًا للجوال ويمكن الوصول إليه باستخدام أي جهاز باستخدام متصفح في شبكتك المحليةيوضح لك هذا الجزء كيفية إنشاء خادم ويب للتحكم في ناتجين باستخدام Arduino IDE. يمكنك استخدام هذه الطريقة لإنشاء خادم ويب مختلف لتلبية احتياجاتك
- المكونات الاساسية :
+ esp8266 nodemcu
- مخطط الرسم البياني :
- كود أردوينو :
// project : ESP8266 Node MCU Web Server with two LED
// By : DIY Channel
// My YouTube Channel :https://www.youtube.com/c/DIYChannel2019
#include <ESP8266WiFi.h>
// Replace with your network credentials
const char* ssid = "diy channel";
const char* password = "00001111";
WiFiServer server(80);
String header;
String output5State = "off";
String output4State = "off";
const int output5 = 5;
const int output4 = 4;
unsigned long currentTime = millis();
unsigned long previousTime = 0;
const long timeoutTime = 2000;
void setup() {
Serial.begin(115200);
pinMode(output5, OUTPUT);
pinMode(output4, OUTPUT);
digitalWrite(output5, LOW);
digitalWrite(output4, LOW);
Serial.print("Connecting to ");
Serial.println(ssid);
WiFi.begin(ssid, password);
while (WiFi.status() != WL_CONNECTED) {
delay(500);
Serial.print(".");
}
Serial.println("");
Serial.println("WiFi connected.");
Serial.println("IP address: ");
Serial.println(WiFi.localIP());
server.begin();
}
void loop(){
WiFiClient client = server.available();
if (client) {
Serial.println("DIY Channel.");
String currentLine = "";
currentTime = millis();
previousTime = currentTime;
while (client.connected() && currentTime - previousTime <= timeoutTime) {
currentTime = millis();
if (client.available()) {
char c = client.read();
Serial.write(c);
header += c;
if (c == '\n') {
if (currentLine.length() == 0) {
client.println("HTTP/1.1 200 OK");
client.println("Content-type:text/html");
client.println("Connection: close");
client.println();
if (header.indexOf("GET /5/on") >= 0) {
Serial.println("GPIO 5 on");
output5State = "on";
digitalWrite(output5, HIGH);
} else if (header.indexOf("GET /5/off") >= 0) {
Serial.println("GPIO 5 off");
output5State = "off";
digitalWrite(output5, LOW);
} else if (header.indexOf("GET /4/on") >= 0) {
Serial.println("GPIO 4 on");
output4State = "on";
digitalWrite(output4, HIGH);
} else if (header.indexOf("GET /4/off") >= 0) {
Serial.println("GPIO 4 off");
output4State = "off";
digitalWrite(output4, LOW);
}
// Display the HTML web page
client.println("<!DOCTYPE html><html>");
client.println("<head><meta name=\"viewport\" content=\"width=device-width, initial-scale=1\">");
client.println("<link rel=\"icon\" href=\"data:,\">");
// CSS to style the on/off buttons
// Feel free to change the background-color and font-size attributes to fit your preferences
client.println("<style>html { font-family: Helvetica; display: inline-block; margin: 0px auto; text-align: center;}");
client.println(".button { background-color: #195B6A; border: none; color: white; padding: 16px 40px;");
client.println("text-decoration: none; font-size: 30px; margin: 2px; cursor: pointer;}");
client.println(".button2 {background-color: #77878A;}</style></head>");
// Web Page Heading
client.println("<body><h1>ESP8266 Web Server By : DIY Channel</h1>");
// Display current state, and ON/OFF buttons for GPIO 5
client.println("<p>GPIO 5 - State " + output5State + "</p>");
// If the output5State is off, it displays the ON button
if (output5State=="off") {
client.println("<p><a href=\"/5/on\"><button class=\"button\">ON</button></a></p>");
} else {
client.println("<p><a href=\"/5/off\"><button class=\"button button2\">OFF</button></a></p>");
}
// Display current state, and ON/OFF buttons for GPIO 4
client.println("<p>GPIO 4 - State " + output4State + "</p>");
// If the output4State is off, it displays the ON button
if (output4State=="off") {
client.println("<p><a href=\"/4/on\"><button class=\"button\">ON</button></a></p>");
} else {
client.println("<p><a href=\"/4/off\"><button class=\"button button2\">OFF</button></a></p>");
}
client.println("</body></html>");
// The HTTP response ends with another blank line
client.println();
// Break out of the while loop
break;
} else { // if you got a newline, then clear currentLine
currentLine = "";
}
} else if (c != '\r') { // if you got anything else but a carriage return character,
currentLine += c; // add it to the end of the currentLine
}
}
}
// Clear the header variable
header = "DIY";
// Close the connection
client.stop();
Serial.println("Abdellatif Mimoune.");
Serial.println("");
}
}
DIY channel


No comments:
Post a Comment