


- كيفية استخدام المعايرة Calibration Graphics على الشاشة TFT LCD DISPLAY مع استخدام ESP8266 NodeMCUتقوم المعايرة بمطابقة الرسومات الموجودة على الشاشة مع الإخراج من شاشة اللمس الخلاصة: يؤدي الاختلال الميكانيكي وعوامل القياس إلى عدم تطابق القيم القادمة من لوحة شاشة تعمل باللمس (كما تُترجم بواسطة وحدة تحكم شاشة تعمل باللمس) والشاشة (عادةً شاشة LCD) التي يتم تركيب لوحة شاشة اللمس عليها. يناقش هذا البرنامج التعليمي كيفية معايرة لوحة الشاشة التي تعمل باللمس لتتناسب مع العرض
- قبل استخدام TFT LCD Shield ، يجب علينا أولاً معايرة شاشة اللمس. نظرًا لعدم وجود أي رسم تخطيطي للمعايرة في مثال المكتبي ، فقد كتبت رسمًا بسيطًا للمعايرة لمعايرة شاشة اللمس. باستخدام هذا المخطط ، المقتبس من مثال رسم tftpaint في Adafruit ، سيعرض الإزاحة التي ستعيد تعيين قيم القيم الأولية لمقاومات TFT إلى إحداثيات الشاشة.
- المكونات الرئيسية :
- ESP8266 NODEMCU

- 2.8 INCH TFT LCD DISPLAY


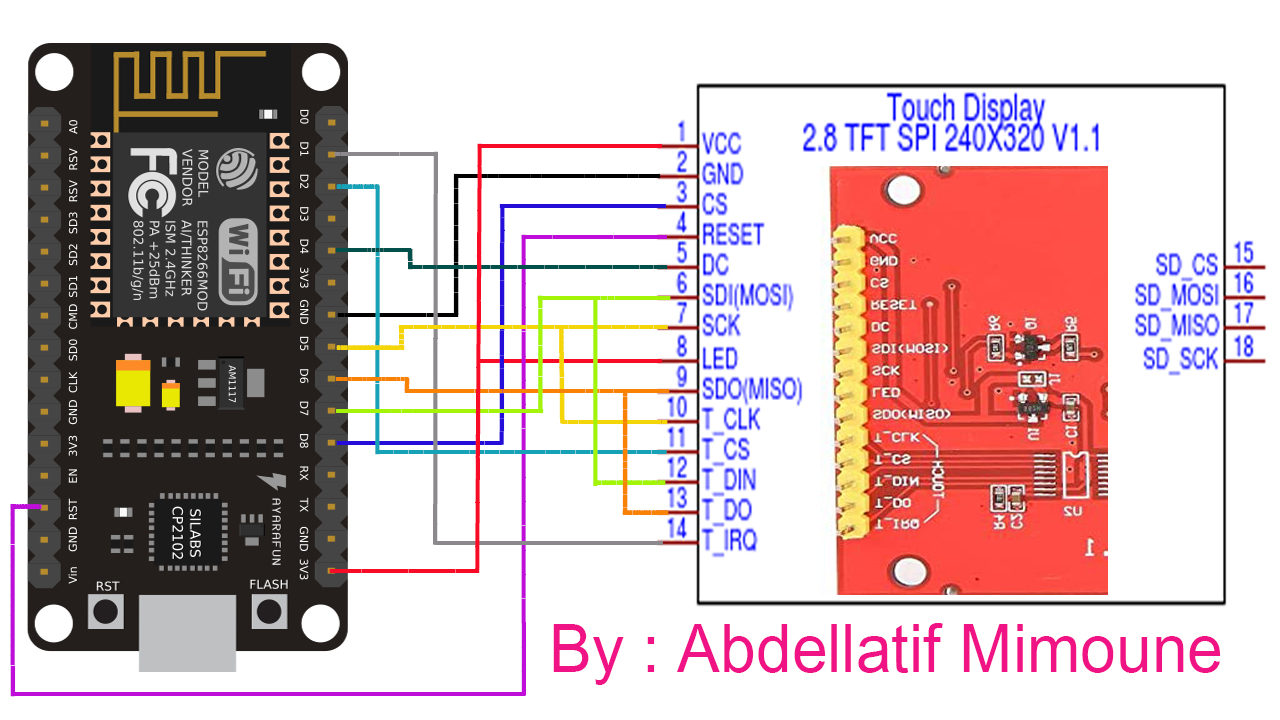
- مخطط الرسم البياني :
- تحميل كود أردوينو :
// Calibration is matching the graphics on the display with ESP8266
// By : DIY Channel
// My YouTube Channel :https://www.youtube.com/c/DIYChannel2019
#include <Arduino.h>
#include <SPI.h>
#include <Adafruit_ILI9341esp.h>
#include <Adafruit_GFX.h>
#include <XPT2046.h>
// For the Esp8266 connection of touch
#define TFT_DC 2
#define TFT_CS 15
Adafruit_ILI9341 tft = Adafruit_ILI9341(TFT_CS, TFT_DC);
XPT2046 touch(/*cs=*/ 4, /*irq=*/ 5);
static void calibratePoint(uint16_t x, uint16_t y, uint16_t &vi, uint16_t &vj) {
// Draw cross
tft.drawFastHLine(x - 8, y, 16,0xff);
tft.drawFastVLine(x, y - 8, 16,0xff);
while (!touch.isTouching()) {
delay(10);
}
touch.getRaw(vi, vj);
// Erase by overwriting with black
tft.drawFastHLine(x - 8, y, 16, 0);
tft.drawFastVLine(x, y - 8, 16, 0);
}
void calibrate() {
uint16_t x1, y1, x2, y2;
uint16_t vi1, vj1, vi2, vj2;
touch.getCalibrationPoints(x1, y1, x2, y2);
calibratePoint(x1, y1, vi1, vj1);
delay(1000);
calibratePoint(x2, y2, vi2, vj2);
touch.setCalibration(vi1, vj1, vi2, vj2);
tft.setTextColor(ILI9341_CYAN);
tft.setTextSize(2);
tft.println("Calibration Params");
tft.println("");
tft.setTextSize(3);
tft.println(vi1);
tft.println(vj1);
tft.println(vi2);
tft.println(vj2);
}
void setup() {
delay(1000);
SPI.setFrequency(ESP_SPI_FREQ);
tft.begin();
touch.begin(tft.width(), tft.height()); // Must be done before setting rotation
tft.fillScreen(ILI9341_BLACK);
calibrate(); // No rotation!!
}
void loop() {
// Do nothing
delay(1000);
}
----------------------------------------------------------------------------
tft,lcd,tft lcd,2.8inch spi tft lcd display,3.2-inch tft lcd,arduino lcd tft tutorial,2.8 inch tft lcd display arduino,2.8 inch tft lcd shield touch display module,arduino tft lcd,tft lcd touchscreen,lcd tft 2.8 tutorious,arduino tft lcd touchscreen,arduino tft lcd touch shield,2.4 inch tft lcd touch screen shield for arduino,tft touch screen,2.4 tft lcd touch screen problem,lcd tft touch screen dht11,tft lcd touch screen library,touch screen tft lcd tutorial,2.4 tft lcd shield white screen


No comments:
Post a Comment